
Table of Contents
Interact with Cloud Storage
Cloud Storage Overview
Amazon Simple Storage Service (S3) is a secure cloud storage service provided by Amazon Web Services (AWS). S3 is utilized to store user-specific files which must persist from one ADCI_Online streaming session to the next. Uploaded metaphase images and reports generated by ADCI are stored in S3 and are not visible to other users. While streaming ADCI, your user-specific S3 folder is mounted to the streaming hardware, allowing you to access your files. Separately, our Data Storage and Retrieval Web App provides an interface to the your user-specific folder in S3, allowing samples to be uploaded to cloud storage, listed, or removed. The Web App also provides a mechanism to download reports generated by ADCI to your local system.
Gain Access to the Data Storage and Retrieval Web App
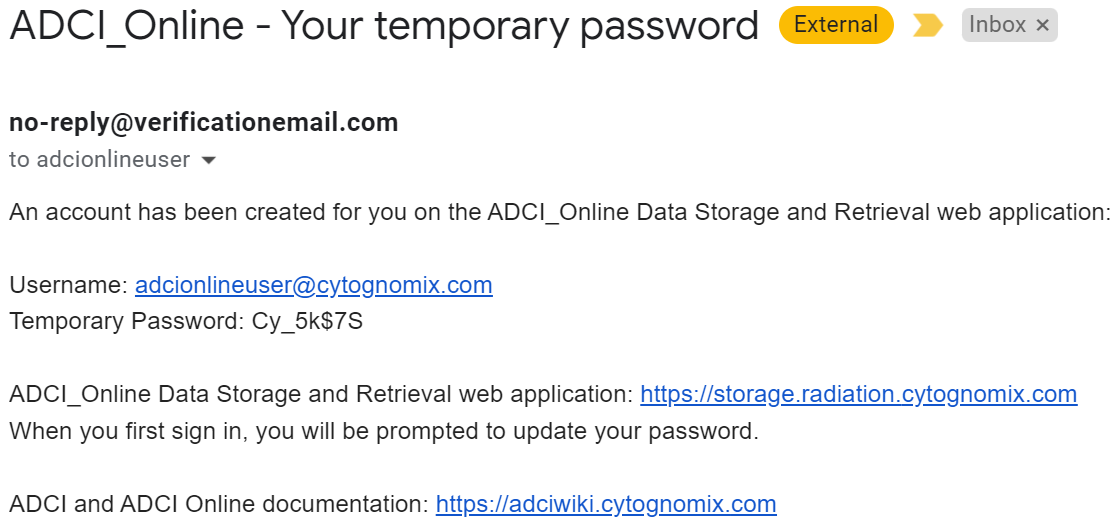
Receive Welcome Email
Before your ADCI Online subscription begins, you will receive an e-mail containing a link to the Data Storage and Retrieval Web App and a temporary password. After successfully logging in to the Data Storage and Retrieval Web App for the first time, a prompt will appear indicating a new password must be specified which will replace the temporary password (see section below).
First Time Sign In and Password Update
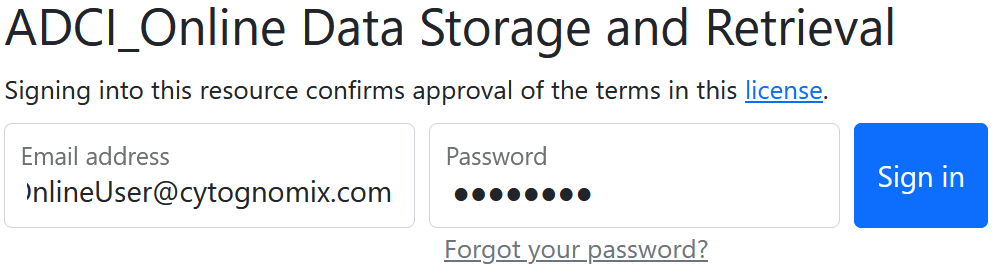
- Navigate to the Data Storage and Retrieval Web App in a web browser ( https://storage.radiation.cytognomix.com).
- Enter your e-mail address and password listed in your welcome e-mail (see above) and click the “Sign in” button. Note your e-mail address is listed as 'Username' in the welcome e-mail.
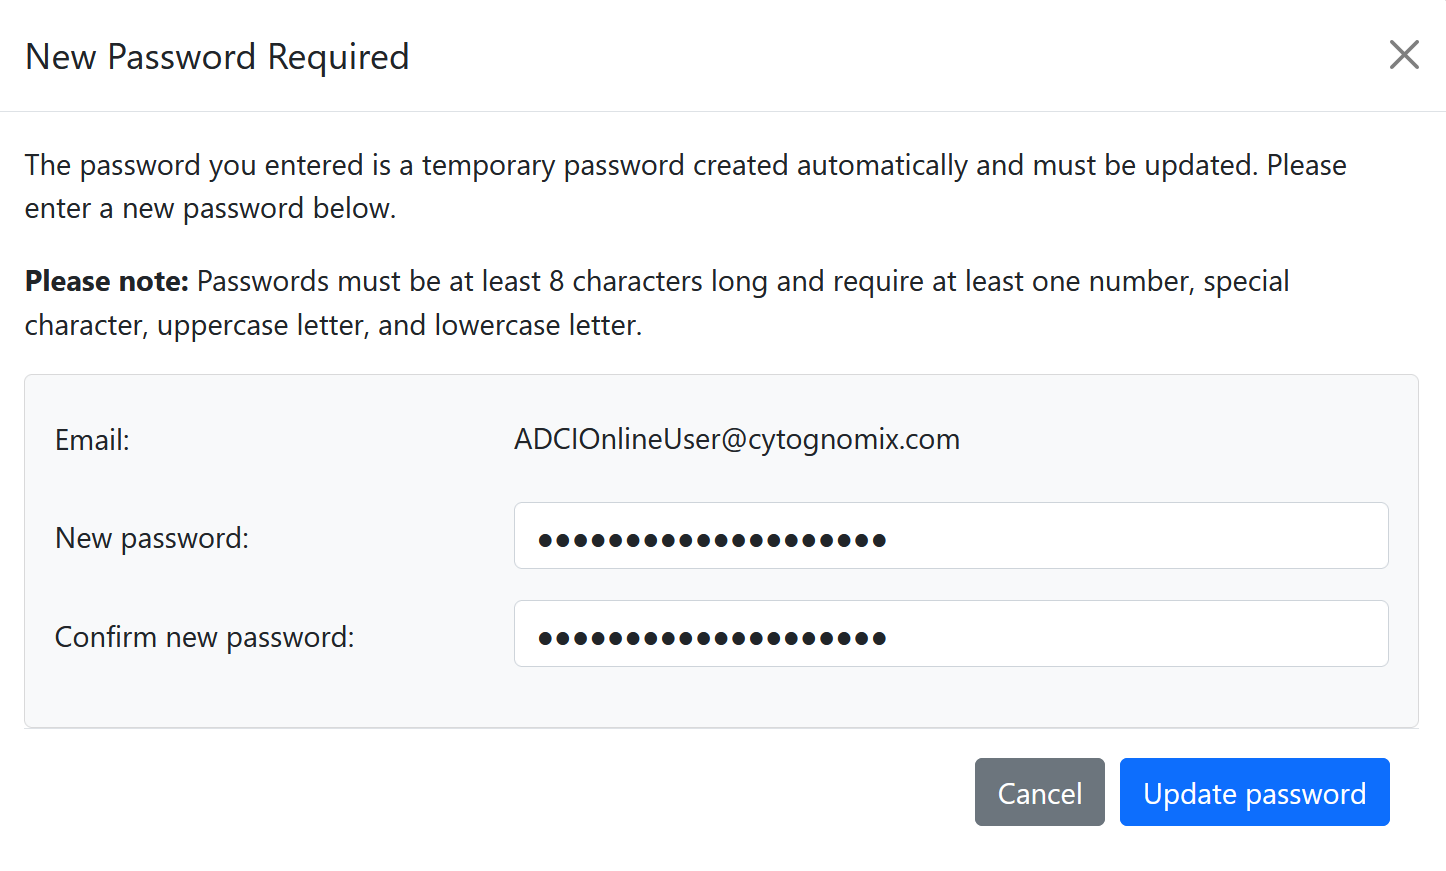
- A dialog box will appear indicating your temporary password must be updated. Please observe the password restrictions: 'Passwords must be at least 8 characters long and require at least one number, special character, uppercase letter, and lowercase letter'.
- Enter a new password and click the “Update password” button. If the new password does not adhere to the restrictions listed above, a second dialog will appear indicating a deficiency in the password. If the new password is accepted, a dialog will appear indicated the password has been updated.
- You must sign in again with your new password to complete the sign in process (see the 'Standard Sign In Process' section below).
Standard Sign In Process
- Navigate to the Data Storage and Retrieval Web App in a web browser ( https://storage.radiation.cytognomix.com).
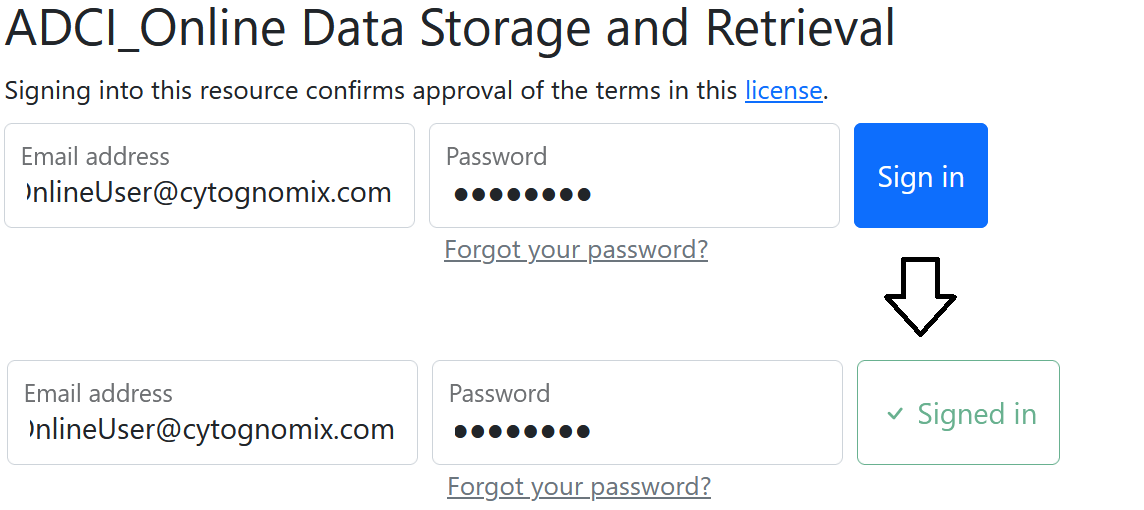
- Enter your e-mail address and password and click the “Sign in” button. Note at this point your password should no longer be the password found in your welcome e-mail, but a password you specified yourself when prompted to update your temporary password (see section above). If you have forgotten your password, consult the 'Reset Password' section on this page.
- Upon successfully signing in, the “Sign in” button will become green and the text within it will change to “Signed in”.
Upload Samples
Prepare Local Files for Upload
First, we must ensure all samples to be uploaded are present on your local system and that metaphase images associated with each sample are stored in separate directories. For example, if you would like to upload two samples (Sample1 and Sample2) to ADCI_Online to be processed, all metaphase images associated with Sample1 must be present in a single directory named 'Sample1'. The same is true for Sample2. The Sample1 and Sample2 directories should contain only metaphase images associated with the particular sample and no other files or directories. An appropriate directory structure on your local system before upload can be seen below:
Note: When a directory containing metaphase images is uploaded to S3, the name of the directory on your local system is used as the name of the directory (sample) on S3. If desired, you may wish to change the name of the directories containing metaphase images before upload.
PathOnYour/
└── LocalSystem/
    ├── Sample1/
    │   ├── img1.TIFF
    │   ├── img2.TIFF
    │   └── ... more metaphase images
    └── Sample2/
        ├── img1.TIFF
        ├── img2.TIFF
        └── ... more metaphase images
Select Sample and Perform Upload
- Navigate to the Data Storage and Retrieval Web App in a web browser ( https://storage.radiation.cytognomix.com) and sign in. Consult the 'Gain Access to the Data Storage and Retrieval Web App' section on this page for more information.
- Scroll to the 'Sample Upload' section of the Data Storage and Retrieval Web App.
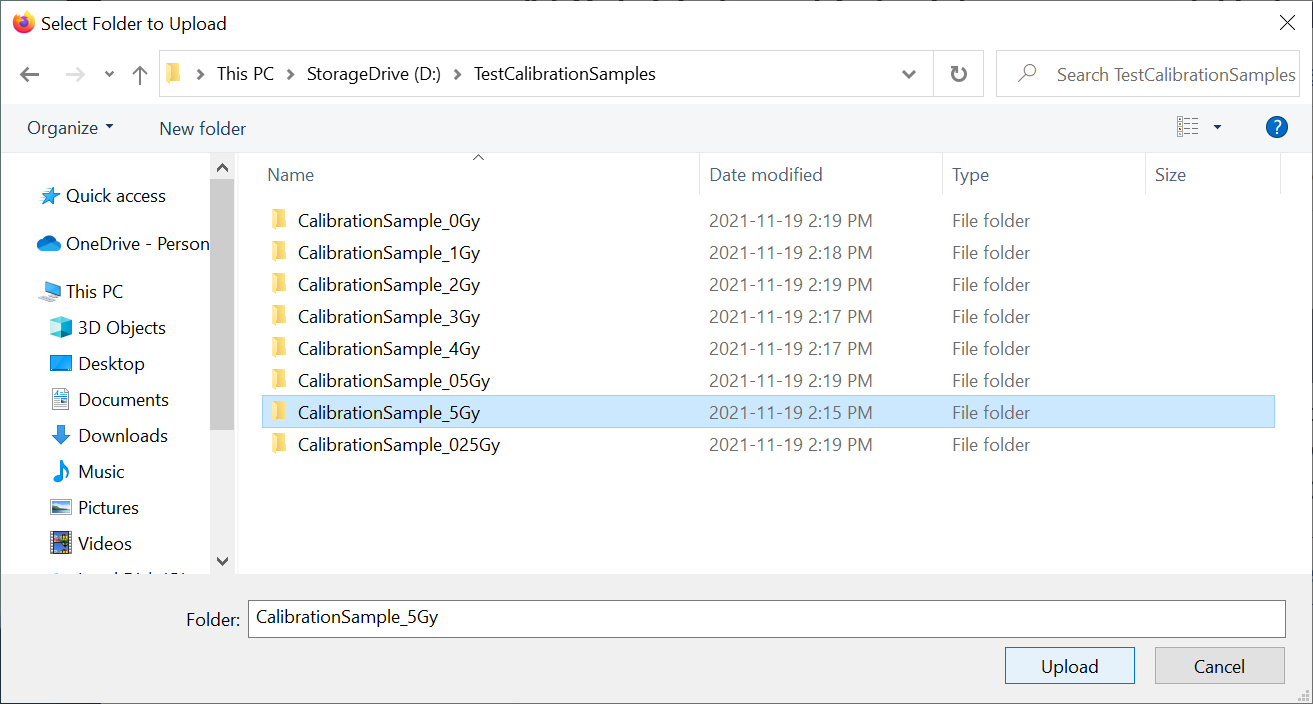
- Click 'Browse…' (located to the left of the 'Upload selected sample' button) and a dialog box will pop up allowing you to browse your local system for the folder you would like to upload.
- Highlight the folder containing metaphase images and click the 'Upload' button (see image to the right, the appearance of the dialog box may vary slightly depending on the web browser used to access the Web App).
- Your browser will likely prompt you to confirm you would like to upload files present in the selected directory, and to only do so if you 'trust the site' (or similar text). Confirm you would like to proceed with the upload.
- (optional) Adjust the upload batch size. In order to increase upload speeds, a 'batch' of images in a sample are uploaded simultaneously. Higher batch sizes will increase upload speeds but put a greater load on your system performing the upload. See the section 'Adjust Upload Batch Size' on this page for more details.
- Click the 'Upload selected sample' button and the upload will begin.
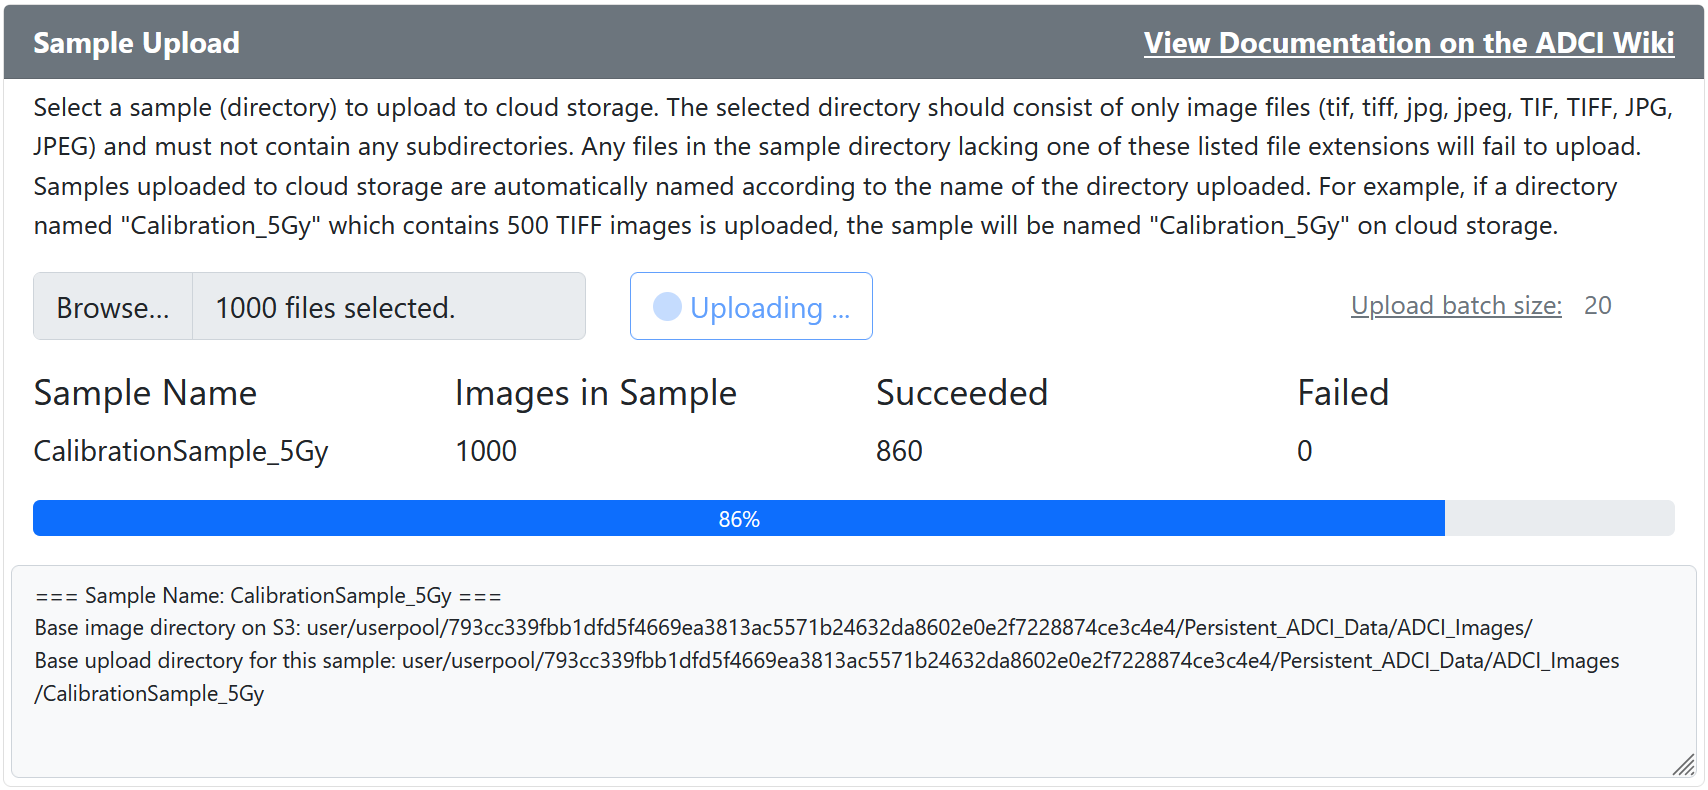
- A progress bar displays the percentage of metaphase images uploaded.
- The 'Sample Name' field is populated with the name of the selected directory (this will be the sample name in cloud storage)
- The 'Images in Sample' field is populated with the number of images (files) present in the selected directory
- The 'Succeeded' field displays the number of images successfully uploaded to cloud storage
- The 'Failed' field displays the number of images which were not successfully uploaded to cloud storage. When an image fails to upload, the reason for the failure is output to the console area beneath the progress bar.
- When the upload process has completed, the time elapsed (minutes) is displayed in the console area.
- When the sample has completed uploading, the above process can be repeated in order to upload additional samples. Please note samples must be uploaded one at a time.
Upload Troubleshooting
In the event images failed to upload during the sample upload process, we must collect more information to determine next steps. First, observe the content of the progress bar, the 'Succeeded' field, and the 'Failed' field. Next, when an image fails to upload, its file name and the reason the upload failed is displayed in the console area beneath the progress bar.
- File Extensions
One reason a file can fail to upload is its file extension. All files must be image files with one of the following file extensions [tif, tiff, jpg, jpeg, TIF, TIFF, JPG, JPEG]. We can confirm if this is the issue by examining the content of the console area. Observe the upload failure message for one of the files which failed to upload. If the file name listed does not have one of the extensions listed above (the listed reason for the failure will read 'Reason: AccessDenied: Access Denied'), it is highly likely that an improper file extension is the reason for the failure. - The Upload was Cancelled by the System
If the progress bar is red and displays 'Upload Cancelled' instead of a percentage, the Web App has cancelled the upload because upload failures were too frequent. A message is also displayed in the console area reading 'Upload failures are too frequent. Cancelling upload.'. The Web App does this when the total number of failures exceeds the total number of successes, and these values are checked after each batch of images are uploaded. If this is the situation, first ensure all files to be uploaded have a proper file extension (see section above). If so, please wait several minutes, close your web browser, navigate to the Web App, sign in, and perform the upload again. If the problem persists, please contact CytoGnomix for assistance. - The Majority of Files Uploaded Successfully
If the majority of images were successfully uploaded but several failures were present, we must determine if the images failed to upload are genuine image files associated with the sample. Consult the console area to view the file names of the files which failed to upload.- If they are not image files, please note the system does not permit files to be uploaded other than the set of image file extensions listed above. In this case, so long as all genuine image files in the sample uploaded successfully, the upload has completed successfully.
- If they are image files with a proper extension (as listed above), then the files may have failed to upload due to an intermittent connection problem or an issue with cloud storage. In this case, please wait several minutes and perform the sample upload again. If the problem persists, please contact CytoGnomix for assistance.
View or Delete Samples in Storage
Once samples have been uploaded to cloud storage, the Data Storage and Retrieval Web App can obtain a count of images in the uploaded sample, or delete the sample. Along with the number of images successfully uploaded which is displayed while uploading a sample, obtaining an image count here is another method to confirm all images in your sample were uploaded successfully.
- Navigate to the Data Storage and Retrieval Web App in a web browser ( https://storage.radiation.cytognomix.com) and sign in. Consult the 'Gain Access to the Data Storage and Retrieval Web App' section on this page for more information.
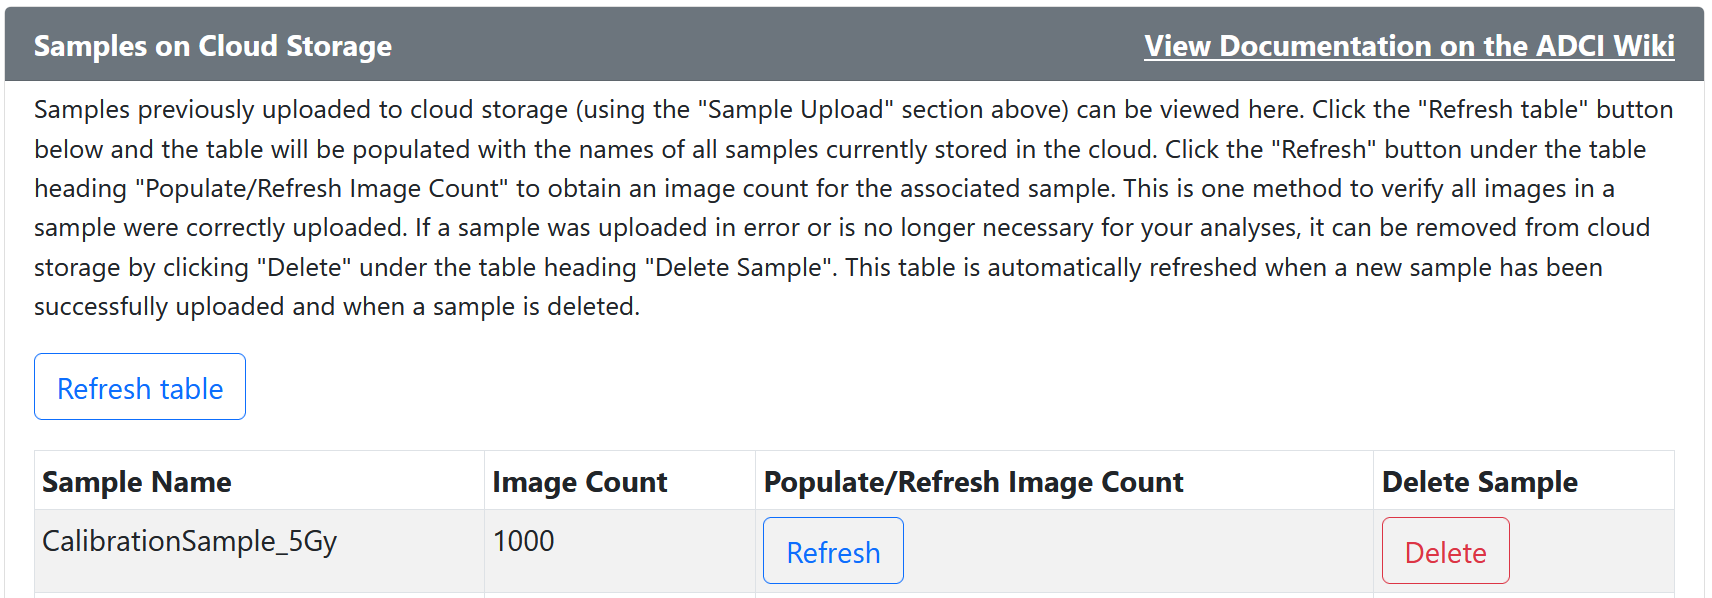
- Scroll to the 'Samples on Cloud Storage' section of the Data Storage and Retrieval Web App (shown in an image to the right).
- Click the 'Refresh table' button (located above the table) to populate the table with samples you have previously uploaded to cloud storage.
- Locate the sample you wish to interact with in the table.
To obtain the number of image files in a sample
- Click the 'Refresh' button associated with the sample
- The 'Refresh' button will briefly display a 'Loading …' state while the system performs an image count
- When complete, the 'Image Count' column in the table will be updated for the associated sample.
To remove a sample from cloud storage
- Click the 'delete' button associated with the sample you wish to remove from cloud storage
- A dialog box will appear prompting you to confirm you want to delete the sample (the sample name is listed here).
- Click the 'Delete sample' button to confirm the deletion, or click the 'Cancel' button to perform no action.
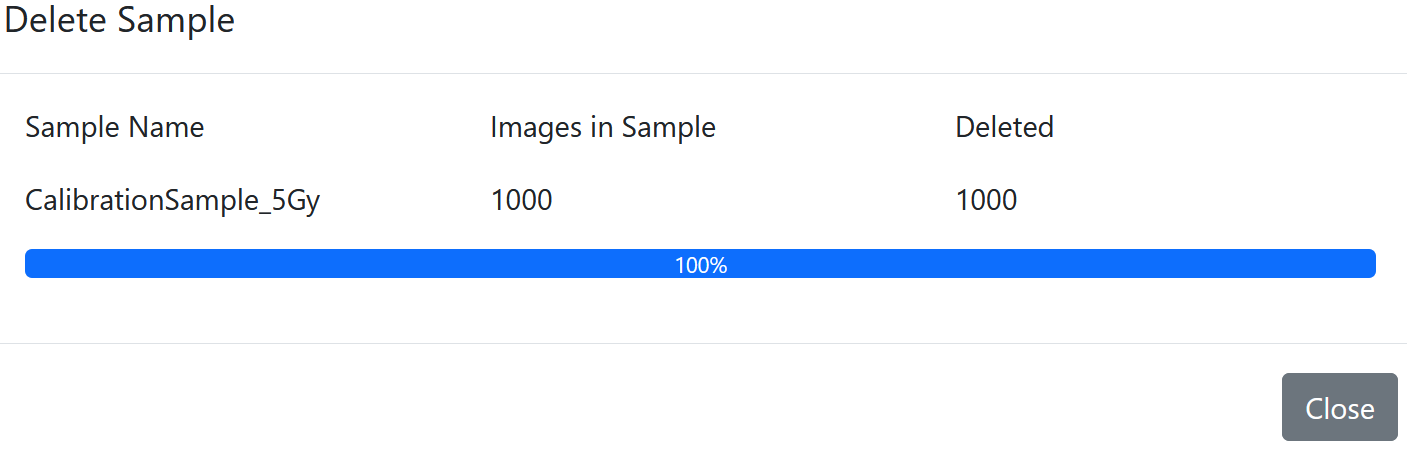
- A new 'Delete Sample' dialog box (shown in an image to the right) will appear containing the name of the sample, the image count of the sample, and the number of images successfully deleted. Sample deletion progress is shown in a progress bar.
- Rarely, some images may not be deleted successfully. If the number of images successfully deleted does not match the total number of images in the sample, simply delete the sample from cloud storage again (by repeating the above steps).
- Click the 'Refresh table' button to confirm the sample has been deleted. The deleted sample should no longer appear in the list of samples.
Download ADCI Reports
Download from Cloud Storage
- Navigate to the Data Storage and Retrieval Web App in a web browser ( https://storage.radiation.cytognomix.com) and sign in. Consult the 'Gain Access to the Data Storage and Retrieval Web App' section on this page for more information.
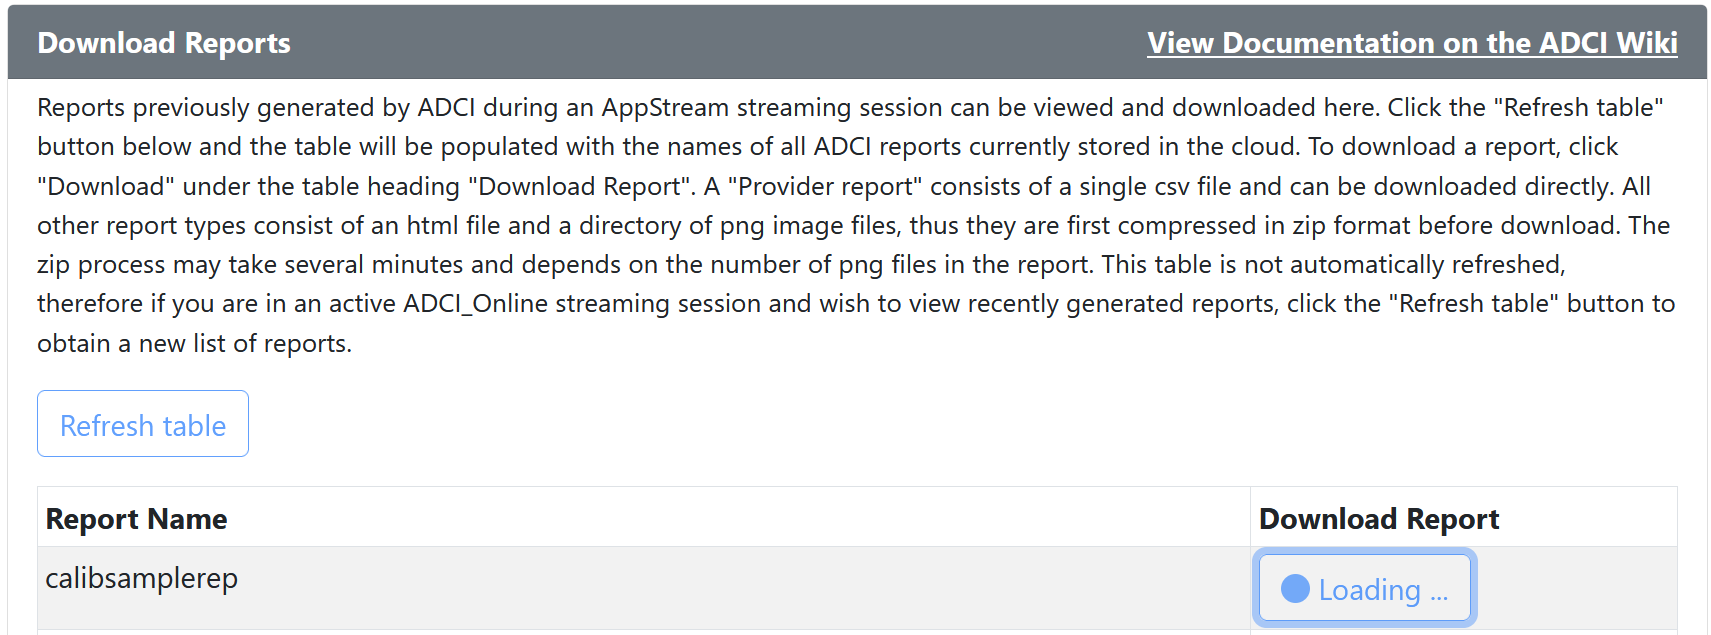
- Scroll to the 'Download Reports' section of the Data Storage and Retrieval Web App (shown in an image to the right).
- Click the 'Refresh table' button (located above the table) to populate the table with reports you have previously generated in an ADCI Online streaming session.
- Click the 'Download' button associated with the report you would like to download.
- If the report is a 'provider' dose report a single csv file will be downloaded, otherwise the report is compressed in '.zip' format before the download can begin. This can take up to several minutes if the report contains a large number of images. During this time, the 'Download' button changes to a 'Loading …' state.
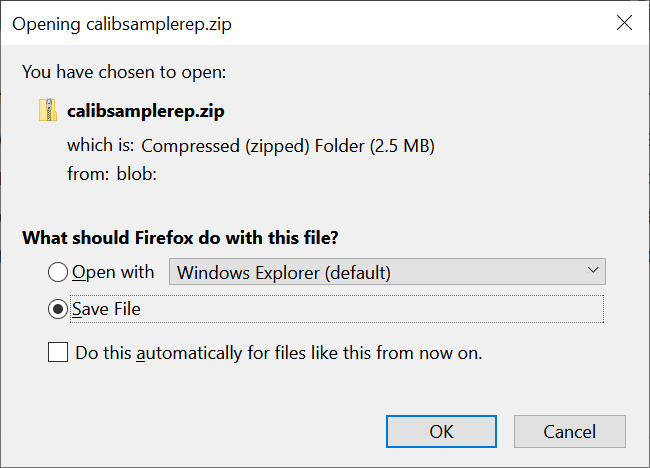
- When the file is ready to be downloaded, your browser will either automatically begin the download or it may ask you whether to 'Open with:' or 'Save File'. In that case, choose 'Save File'.
- The download will now begin. Report csv or zip files are generally quite small, thus the download will likely complete within a small number of seconds.
View Reports on your Local System
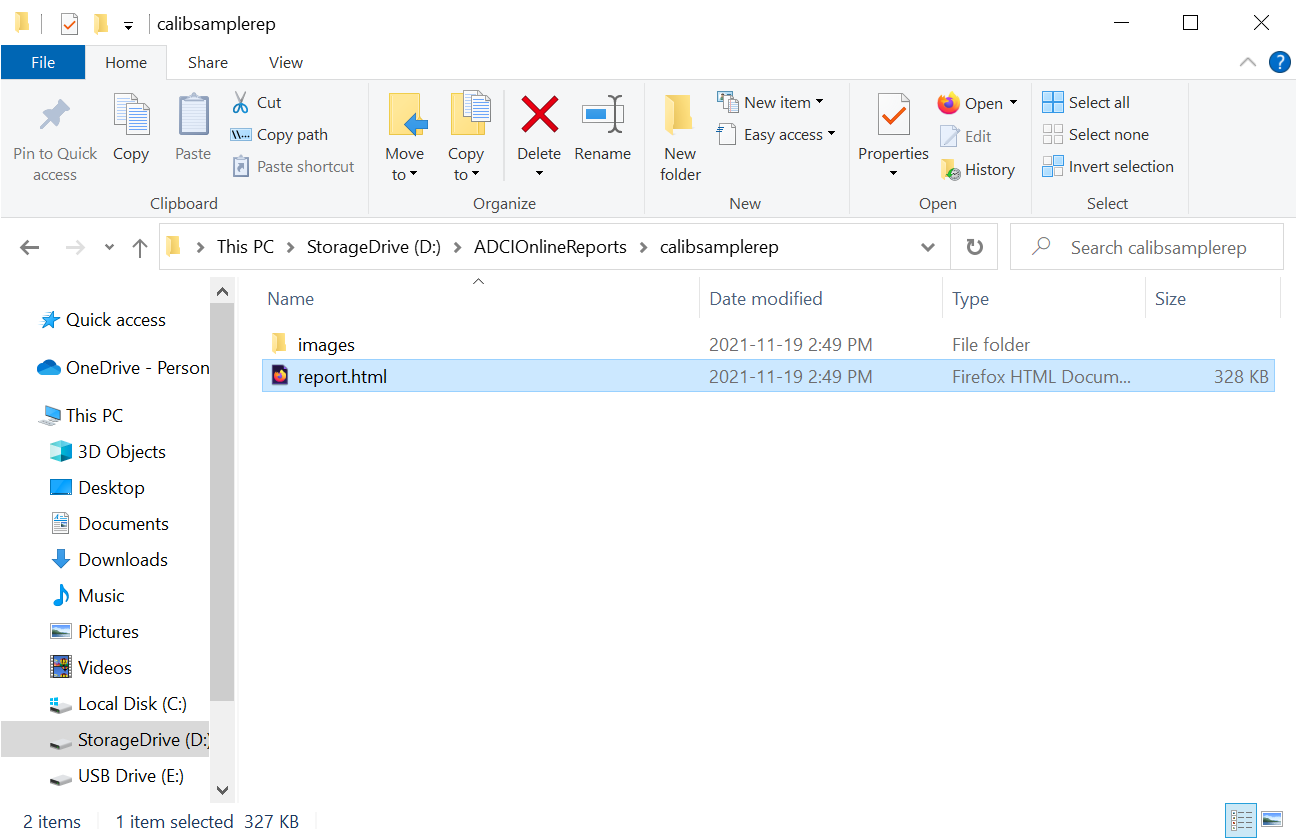
- In Windows file explorer, navigate to the location where the report was downloaded. This will likely be your 'Downloads' folder, or a location you chose when downloading the report.
- (Optional) Move the downloaded zip/csv file to another location on your hard drive.
- If the report is a csv file, simply double click it to open it in your default spreadsheet software.
- If the report is a zip file, it must be extracted before viewing. Right click the zip file and choose 'Extract All…'. The extracted files will consist of:
- A directory named according to the name of the report
- A 'report.html' file within the report directory
- An 'images' directory within the report directory which contains all images contained in the report.
- To view the report, double click the 'report.html'. The report will open in your default web browser.
Additional Web App Functions
Reset Password
- Navigate to the Data Storage and Retrieval Web App in a web browser ( https://storage.radiation.cytognomix.com).
- Click the “Forgot your password?” link located under the password input area.
- A dialog box will appear with the title 'Reset Password'.
- Enter the e-mail address you would use to sign into the Web App in the 'Email' input area in the dialog box. If you forget which e-mail address is associated with the Web App, search your inboxes for an e-mail titled 'ADCI_Online - Your temporary password' (the welcome e-mail sent to new Web App users).
- With the e-mail address filled in, click the 'Send code' button and wait for the an e-mail to arrive in your inbox containing a verification code. By providing this verification code, the system knows you are the rightful owner of the account. A verification code is valid for 24 hours, however if your code expires before the password reset has been completed, simply request another code.
- Enter the verification code you received in the 'Code' input area.
- Enter a new password and click the “Update password” button. Note 'Passwords must be at least 8 characters long and require at least one number, special character, uppercase letter, and lowercase letter'.
- Upon successful completion of the password reset, you must sign in to the Data Storage and Retrieval Web App in order to access its functions.

Adjust Upload Batch Size
In order to increase upload speeds, a 'batch' of images in a sample are uploaded simultaneously. Higher batch sizes will increase upload speeds but put a greater load on your system performing the upload. Recommended system configurations suitable for each batch size are listed in a dialog box in the Web App when adjusting batch size.
- Navigate to the Data Storage and Retrieval Web App in a web browser ( https://storage.radiation.cytognomix.com) and sign in. Consult the 'Gain Access to the Data Storage and Retrieval Web App' section on this page for more information.
- Scroll to the 'Sample Upload' section of the Data Storage and Retrieval Web App.
- Click 'Upload batch size' to the right of the 'Upload selected sample' button.
- A dialog box will appear describing the process to select an appropriate batch size for your system configuration. Click the 'Close' button at any time to keep the batch size at its current value.
- Select a new batch size appropriate for your system configuration from the 'Select batch size' dropdown box.
- Click the 'Update batch size' button to adjust batch size.
- Please note, whenever the Data Storage and Retrieval webpage is reloaded (or your browser is closed), the batch size will reset to its default value of 20.