Table of Contents
Main GUI
The GUI of ADCI-BGQ consists of two windows, the login window and the main window.
Login window
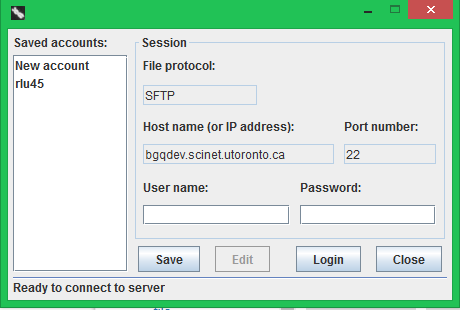
The login window is what you will first see after starting ADCI-BGQ. In this window, you enter the user name and password of your account, then click the ‘Login’ button.
You can save your user name by clicking the ‘Save’ button, so that you will not need to enter it by hand next time. All saved user names are listed on the left side; you can select one to use it. You can also edit the selected user name by clicking the ‘Edit’ button, then save it by clicking the ‘Save’ button. You can delete a saved user name by right-clicking on it and clicking the ‘Delete’ pop-up menu item.
If the connection is successful, this login window will disappear, and the main window will appear; if the connection failed, for example due to a wrong user name or password or no internet access, the status bar at the bottom will display a ‘Connection failed’ message. You can also close ADCI-BGQ by clicking the ‘Close’ button.

Main window
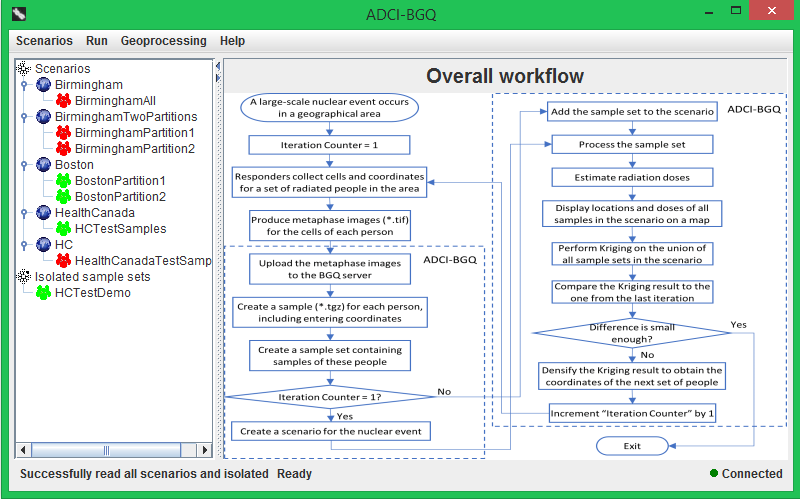
The main window consists of four major areas, which are the top menu bar, the bottom status bar, the left tree panel displaying all created areas and sample sets, and the right content panel.

The top menu bar consists of four major menus. Menu items for the operations to manage samples, sample sets and scenarios (e.g. create a new sample, sample set or scenario) are under the ‘Scenarios’ menu. Menu items for the steps ‘Process a sample set’ and ‘Estimate radiation doses’ of the workflow are under the ‘Run’ menu. Menu items for the geoprocessing functionalities (e.g. ‘Display sample locations and doses on a map’, ‘Perform Kriging’, 'Compare Kriging results' and 'Densify Kriging result') are under the ‘Geoprocessing’ menu. The 'Help' menu contains three menu items, i.e. 'Start page' showing the workflow again, 'Help content' opening this online Wiki documentation in a browser and 'About' showing authoring information of this software.
The left tree panel lists each scenario that has been created to date and the sample sets contained within it, and each isolated sample set that does not belong to a scenario. A sample set may have a red, yellow or blue icon. A red icon means that it has not been processed; a yellow icon means that it was processed, but dose estimation has not been performed; a green icon means that radiation doses the contained samples were exposed to were estimated with calibration curves and image selection models.
The right content panel displays the detailed components necessary for accomplishing the current step of the workflow that you are performing, thus its contents vary across different steps (see the following sections). Initially, it displays the overall workflow of ADCI-BGQ (see the figure above). You can also come back to view the workflow by clicking the 'Start page' menu item under the 'Help' menu.
The bottom status bar, consisting of three status labels, displays the resultant message of finishing a task. The left label displays messages from operations related to the scenario tree. The middle label displays messages from operations related to the specific step currently being performed in the right panel. The right label displays the current status of the secure connection to the BGQ server. If the connection is good, then a green icon will show; if the connection is down, the icon will turn red and an information dialog will pop up to prompt you to check the server and internet statuses.
