
This is an old revision of the document!
Table of Contents
Partial-body dose estimation
Feature present since ADCI version 1.12.
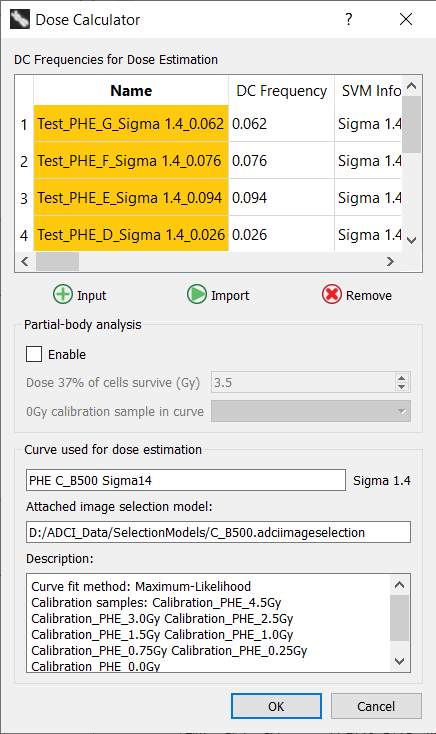
Enable partial-body dose estimation
Partial-body dose estimation can be performed on processed test samples. It can be enabled by first executing the dose estimation wizard (recommended method) or directly through the dose calculator. Whether the dose estimation wizard was executed first or not, clicking the checkbox labeled “enable” in the Dose Calculator dialog will instruct ADCI to perform partial-body analysis in addition to standard whole-body dose estimation.
Partial-body dose estimation requires a calibration curve with both an associated SVM sigma value and image selection model. These conditions will almost always be met if the calibration curve was generated using the curve calibration wizard. In the event either contidion is not met, the “enable” checkbox will be disabled and a tooltip describing the unmet condition will be displayed if the mouse is hovered over the disabled checkbox.
Test samples can be imported in the same manner as standard whole-body dose estimation. Consult documentation related to the dose estimation wizard (recommended method) and how to automatically import test samples to the Dose Calculator. Manual entery of dicentric freqencies is not compatible with partial-body dose estimation as the distribution of DCs across all images in a sample is required.
Enable partial-body dose estimation (contd)
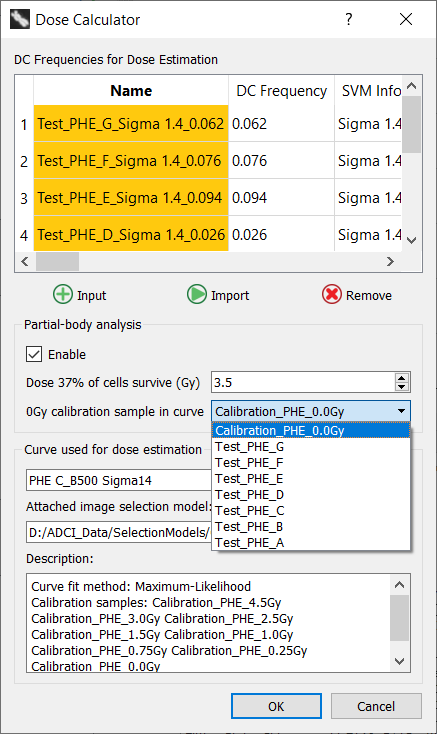
After clicking the “Enable” checkbox, the dose at which 37% of irradiated cells survive must be provided. It is pre-populated based on the value specified in the “Partial-body Preferences” dialog described at the end of this page. The value can be adjusted here either by typing in the desired value or by using the mouse wheel while hovering the mouse above the “Dose 37% of cells survive” spinbox.
The 0Gy calibration sample used to generate the calibration curve must be selected from the “0Gy calibration sample in curve” dropdown. All samples currently in the main GUI sample list are present in the dropdown.
It is important to ensure the 0Gy calibration sample used to generate the curve is selected in the “0Gy calibration sample in curve” dropdown. ADCI attempts to pre-populate the dropdown with the appropriate sample, however it does this by attempting to parse sample filenames and may not always pre-populate the dropdown correctly. Additionally, the 0Gy calibration sample must first be present in the main GUI sample list in order to appear in the dropdown.
Once all desired test samples are present in the Dose Calculator, a desired value for “Dose 37% of cells survive” is specified, and the appropriate 0Gy calibration sample is selected in the “0Gy calibration sample in curve” dropdown click the “OK” button to begin the analysis. After a short delay, a progress bar will display the progress of the dose estimation.
Interpret partial-body dose estimation results
Please note the content of the plot area in the main GUI reflects the results of standard whole-body dose estimation and not partial-body dose estimation. Whether partial-body analysis is enabled or not, the plot will always reflect whole-body results.
Partial-body dose estimation results are appended to standard whole-body results in the console area within the main GUI. Example console output is shown below. These output fields also appear in dose estimation reports if partial-body analysis was performed and are available as user-selected fields for provider (csv) dose estimation reports.

- PB Estimated Dose
Estimated dose (Gy) of the irradiated fraction.
- PB Estimated Dose LCL
Estimated dose (Gy) of the irradiated fraction lower confidence limit. The mean dicentric yield of the irradiated fraction is calculated as part of the Contaminated poisson method. The mean dicentric yield minus one standard deviation is compared to the curve to arrive at this value.
- PB Estimated Dose UCL
Estimated dose (Gy) of the irradiated fraction upper confidence limit. The mean dicentric yield of the irradiated fraction is calculated as part of the Contaminated poisson method. The mean dicentric yield plus one standard deviation is compared to the curve to arrive at this value.
- PB Cells Irradiated
Estimated percentage of total cells exposed.
- PB Cells Irradiated LCL
Calculated using PB Estimated Dose UCL in place of PB Estimated Dose
- PB Cells Irradiated UCL
Calculated using PB Estimated Dose LCL in place of PB Estimated Dose
In the event the Contaminated poisson method cannot be performed, all fields listed above will read “Err”. At least one image in a test sample must contain >1 DC in order for the method to be performed. Additionally, because of this requirement the Contaminated poisson method cannot be performed on a manually entered DC frequency.
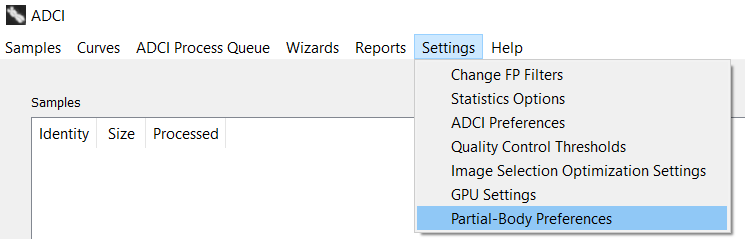
Access parameters dialog
Access the “Partial-body Parameters” dialog through the menu bar location at the top of the main gui. Click “Settings” and then select “Partial-Body Preferences”.
Description of settings
- Expected baseline DC frequency for an unirradiated sample
Baseline DC frequency in unirradiated cells varies between studies, reported to range from 0.00009 to 0.00299 1). Baseline DC frequencies may vary between laboratories. Keep in mind this value does not reflect the DC frequency reported by ADCI for an unirradiated sample, instead it is the DC frequency for an unirradiated sample scored by an expert. We have selected a default baseline DC frequency of 0.00078 based on Lloyd et al. 1980 2).
- Dose at which 37% of irradiated cells survive
Corresponds to the term D0 in the Contaminated poisson method as described within the IAEA manual in section 9.7.4.3 3) and varies based on the type of radiation to which a individual was exposed. The default value for this parameter is 3.5Gy.
- Fraction of total images to place in each randomly generated sample
Random subsets of images from an unirradiated sample are derived in order to determine an expected minimum number of DCs. A fraction of 0.5 means each randomly selected subset contains 50% of the images found in the original unirradiated sample. The default value for this parameter is 0.5.
- Minimum image count in randomly generated samples (overrides fraction)
A minimum image count for each randomly generated subset. For example, if a 0Gy calibration sample contains 1000 images and a fraction of 0.4 is applied, 400 images will be present in each subset. Then, if the minimum image count specified here is higher than 400, the minimum image count will override the fraction and each randomly generated subset will contain the minimum image count. Additionally, if the minimum image count is higher than the number of images in the 0Gy calibration sample, dose estimation will be aborted. The default value for this parameter is 500.
- Number of randomly generated samples to create
Count of randomly generated subsets to create. A higher number will increase dose estimation consistency but will require more computation time. The default value for this parameter is 500.
