Table of Contents
Metaphase image viewer
The metaphase image viewer is accessed by first highlighting a processed sample in the list of samples within the mainGUI, then clicking the ![]() icon.
icon.

Meaning of coloured contours
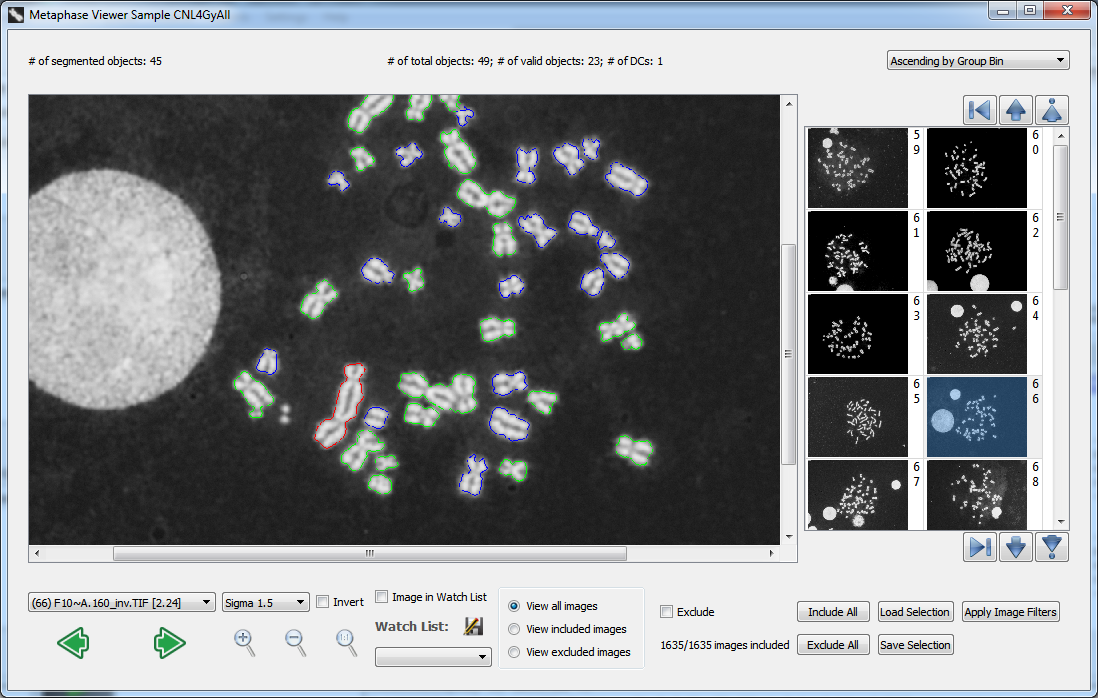
After sample processing, the software outlines each processed chromosome in a metaphase cell in color. Objects without outlines represent overlapped chromosomes, nuclei and debris, which are not included in counts of objects in a cell. Coloured contours represent the following:
- Red - Dicentric.
- green - Monocentric.
- blue - Unclassifiable.
- yellow - Monocentric. In this case the SVM classified the chromosome to be dicentric, however the false positive filter reclassified the chromosome as monocentric.
To hide these contours and view unprocessed images, select “Unprocessed” from the SVM Sigma dropdown.
Navigating images
Dropdown list and arrows
A dropdown list and arrows are present on the bottom left of the window. The dropdown list contains a list of images, through which specific image file names can be selected and viewed. Clicking the ![]() arrow icon shows the previous image in the dropdown list, while clicking the
arrow icon shows the previous image in the dropdown list, while clicking the ![]() arrow icon shows the next image.
arrow icon shows the next image.
SVM Sigma value
Select an SVM sigma value to view images as they were classified at the specified sigma. Coloured contours may change as the sigma value increases or decreases. Generally, more dicentric chromosomes are found at higher sigma, but experience a higher false positive rate. For a more detailed description, consult the SVM sigma value page.
Invert image
The “Invert” checkbox will invert color and brightness values of each pixel in the metaphase image.
Zoom control
 - Zoom in
 - Zoom out
 - Return level of zoom to default
Thumbnail view
Thumbnails of metaphase images are displayed on the right side of the Metaphase Image Viewer window. Thumbnails are ordered according to the current selection within the sorting dropdown box found in the upper-right corner of the window. In this way, the order of thumbnail images mirrors the image selection dropdown in the bottom-left of the Metaphase Image Viewer window. A number appears to the right of each thumbnail which corresponds to the image number found in the image selection dropdown.
Thumbnails are read from the file system and loaded into the thumbnail viewer within a certain display range based on screen size. More thumbnails can be displayed simultaneously by increasing the number of thumbnail columns (see control icons below). Note that increasing the number of thumbnails displayed will increase loading times when shifting the display range up or down a full page.
 - Shift display range up one image
 - Shift display range down one image
 - Shift display range up one full page
 - Shift display range down one full page
 - Display an additional column of thumbnails (6 columns maximum)
 - Remove a column of thumbnails (1 column minimum)
The thumbnail view and Metaphase Image Viewer itself are interconnected such that when a new image is selected in one of them, the other will update accordingly. When a thumbnail is clicked, the large image to the left of the thumbnails will update displaying the selected image. Similarly, when a new image is selected through the image selection dropdown or by clicking the ![]() or
or ![]() arrow icons, the appropriate thumbnail is automatically highlighted.
arrow icons, the appropriate thumbnail is automatically highlighted.
Watch list
While examining metaphase images, you may wish to keep track of several images of interest to easily return to later. To keep track of an image currently being viewed, check the “Image in Watch List” checkbox. The image will now appear in the “Watch List” dropdown. Multiple images can be added in this way. To return to an image in the watch list, select the desired image from the watch list dropdown. A list of files currently within the watch list can be saved by clicking the ![]() icon and selecting a save destination. Note a saved watch list cannot currently be loaded back into the ADCI software but exists as a list of files which can be manually selected later. The saved file contains the save date, sample name, sample directory, and the list of image files in the watch list.
icon and selecting a save destination. Note a saved watch list cannot currently be loaded back into the ADCI software but exists as a list of files which can be manually selected later. The saved file contains the save date, sample name, sample directory, and the list of image files in the watch list.
Manual image selection and image selection models
Please consult the image selection model page before continuing if you have not already done so before continuing. The content below assumes a knowledge of image selection model functionality. Note that the result of applying image selection models or manually excluding variants is not saved automatically between ADCI sessions. If you wish to carry your changes over to a future execution of ADCI software, ensure your selections are saved as described under the “Save/Load selection” heading below.
Select subset of images
All of - or a subset of - the total images present in the sample directory will appear in the dropdown on the left side of the screen. Which images appear in the dropdown is controlled by a group of radio buttons:
- View all images - default
All images appear in the dropdown. - View included images
Only those images which have not been excluded by the applied image selection model (or by manual exclusion) appear in the dropdown. - View excluded images
Only those images which have been excluded by the applied image selection model (or by manual exclusion) appear in the dropdown.
Manually exclude image
To manually exclude an image, click the “Exclude” checkbox. Note images excluded in this manner will not be used in calibration curve generation or dose estimation regardless of whether they pass the filters of an applied image selection model. This is an additional level of exclusion unrelated to image selection models.
Save/Load selection
The current list of included images can be saved by clicking the “Save selection” button. You will be prompted to assign this selection a file name. To load a previously saved selection, click the “Load selection” button and locate the appropriate saved selection.
Create, apply, and save an image selection model
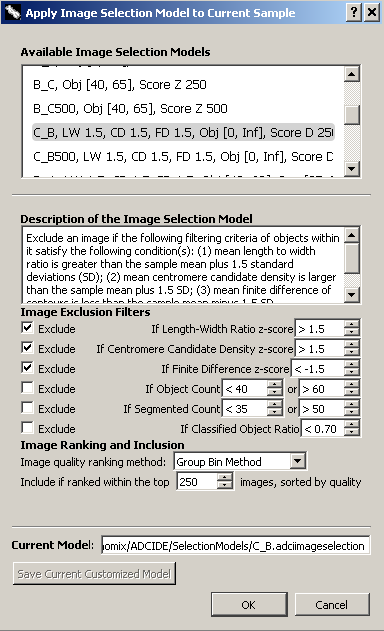
Open the image selection model dialog by clicking the “Apply Image Filters” button. Please consult the image selection model page for descriptions of each filter presented in this dialog. Once the parameters of an image selection model have been specified, the current selections can be saved by clicking “Save Selection Model”. To apply the newly created model to the current sample click “OK”.

Load and apply an image selection model
To load a previously saved image selection model and apply it to the current sample click the “Apply Image Filters” button. A dialog will appear (seen above under the “Create an image selection model” heading) containing a the button “Load Selection Model”. Click the button, locate the saved image selection model, and press “OK”. The loaded image selection model is now applied to the sample.
