
Table of Contents
Sample
A sample is a collection of TIFF image files (.tif or .tiff extension) of metaphase cells stored in a directory. Samples must be processed to become processed samples before they can be used to generate calibration curves or as test samples to estimate radiation dose. The steps necessary to process a sample can be found on the processed sample page.
Create a new sample
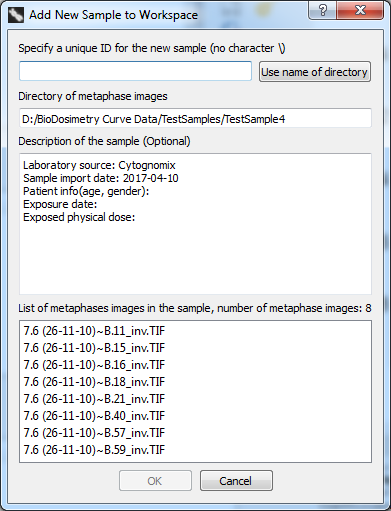
To create a new sample, click the ![]() icon. A dialog will appear to allow selection of a directory. Select the desired sample directory containing metaphase image files and click “Select Folder”.
icon. A dialog will appear to allow selection of a directory. Select the desired sample directory containing metaphase image files and click “Select Folder”.
- Specify a unique ID for the new sample
A name for the sample to be created. This identifier will appear under “identity” within the list of samples in the main GUI. Click the “Use name of directory” button to populate the unique ID field using the sample directory name. This can be done automatically if desired each time a sample is created by modifying the setting [Settings (menu bar) → ADCI Preferences → Prepopulate sample ID using name of directory containing metaphase images].
Physical dose of the sample can be embedded in its ID, which may be recognized by ADCI automatically. Embedded physical dose has to be in the format of #Gy. For example, a 0.25 Gy sample generated on Oct 25th can be named as 'Oct25-0.25Gy', 'Oct25 S 025 GY' or 'Oct25Sample0_25 gy'. If it is named as 'Oct25 025Gy', ADCI will receive its dose incorrectly as 2.5025 Gy. Use a character other than space or underscore to separate dose from prefix.
Please note the ID of a sample cannot be easily changed after it is created. If the sample ID must be modified, a “workaround” is described below under the heading “Rename a sample”.
- Directory metaphase images
Cannot be modified. Displays the directory selected in the directory selection step. - Description of the sample (Optional)
Description is optional and is not required to be formatted in any specific way. The content within the description of a sample is simply displayed when the sample is highlighted in the main GUI and is not used in any calculation. Preset text within the description such as “Laboratory source”, “Patient info”, etc. may be filled in or removed entirely if desired. “Laboratory source” is prepopulated based on the content of [Settings (menu bar) → ADCI Preferences → Laboratory Name]. “Sample import date” defaults to the current date. If multiple samples derived from the same individual are present, it may be desirable to record the sample IDs of the other samples associated with the individual within the description of newly created samples. - Number of metaphases
Cannot be modified. Reports the number of TIFF image files found in the new sample directory. - List of metaphases in the sample
Cannot be modified. A list of TIFF image files found in the new sample directory. - Submit to add new sample to workspace
The new sample may be created once it has been assigned a unique ID in the first step of this dialog. Click “OK” to add this sample to the workspace.
Supported image formats
ADCI supports metaphase images supplied in TIFF/TIF or JPEG/JPG format. All TIFF/TIF and JPEG/JPG images within the specified Sample directory will be examined while processing the sample in the process queue even if both formats are present in the same Sample. Files with other extensions present in the specified Sample directory are ignored by ADCI.
It is preferable to supply ADCI with TIFF/TIF images as it is a “lossless” image format, while JPEG/JPG is typically a “lossy” format. During the process of “lossy” compression, image fidelity is reduced which may lead to different dicentric counts between TIFF/TIF and JPEG/JPG formats even if the images were derived from the same microscope and saved in both TIFF/TIF and JPEG/JPG formats. While JPEG/JPG images may appear to have no perceptible decline in image fidelity, image processing algorithms used within ADCI are sensitive to minor changes in quality.
Open a saved sample
To import a sample which has previously been saved, click the ![]() icon. A dialog will appear allowing you to select saved samples from the file system. Saved samples have the file extension adcisample.
icon. A dialog will appear allowing you to select saved samples from the file system. Saved samples have the file extension adcisample.
Save a sample
Samples cannot be saved until they are processed to become a processed sample. When a sample has completed processing a dialog appears asking if you would like the save the processed sample. To save a processed sample at a later time, highlight the appropriate sample in the Samples list within the main GUI and click the ![]() icon.
icon.
In the event of an unexpected shutdown during sample processing, samples are of course not saved in the normal manner. However, some samples which completed processing before the shutdown may be recoverable if multiple samples were processed in the process queue. For more information on recovering unsaved samples, consult the sample recovery page.
Edit sample description
To edit the description of an existing sample, highlight the appropriate sample within the Sample list in the main GUI and click the ![]() icon. A dialog will appear similar to the dialog which was used to create the sample. The sample description can be modified under the heading “Description of the sample (Optional)”. After modifications to the description have been completed, click “OK” and the new description will be saved.
icon. A dialog will appear similar to the dialog which was used to create the sample. The sample description can be modified under the heading “Description of the sample (Optional)”. After modifications to the description have been completed, click “OK” and the new description will be saved.
Rename a sample
Once a sample has been created its sample ID cannot be changed. This is because ADCI assumes sample IDs are unchanging and IDs are used to “link” a sample with its associated contour files. When a sample is saved, a file is created with the extension “.adcisample”. Note that this file name is unrelated to the sample ID. The file name can be changed arbitrarily as long as the extension remains “.adcisample”, however changing the file name has no effect on the sample ID or ADCI in general.
If a sample ID must be changed, you must create a new sample using the same images as the old sample, provide the desired sample ID during sample creation, and process the new sample. The content of the two ADCI samples should now be identical, however the newly created sample will have the desired ID. Please note, any previously generated reports containing the old sample will not be updated with the new sample ID. If this is an issue, we suggest providing the ID of the old sample within the description field of the new sample. In this manner, newly generated reports will display the description of the new sample, providing a method to locate the sample in older reports which contain the previous sample ID.
Process a sample
Add sample to ADCI Process Queue
Samples created in the previous step must be processed in order to obtain dicentric counts in each sample. If a saved sample was opened, it has already been processed. To check if a sample has been processed, observe the list of samples in the mainGUI under the heading “Processed”. Unprocessed samples must be added to the process queue for processing. To do so, highlight an unprocessed sample and click the ![]() icon.
icon.
Process samples within the ADCI Process Queue
Items in the process queue can be processed individually by highlighting an item in the process queue and clicking the ![]() icon. All items currently in the process queue can be processed sequentially in one click by clicking the
icon. All items currently in the process queue can be processed sequentially in one click by clicking the ![]() icon.
icon.
View sample description and DC frequencies
When a sample is highlighted in the Sample list within the main GUI, information about the highlighted sample is shown in the console. DC counts and frequencies will be part of this information if the sample has been processed.
- Sample
ID of sample specified when the sample was created. - Metaphase Images Path
Absolute path to the directory associated with the sample containing metaphase images. - Description
The description of the sample specified when the sample was created. This description can also be modified by highlighting the sample in the Sample list within the main GUI and clicking the icon.
icon. - Number of Images (All)
Count of all metaphase image files found in the “Metaphase Images Path” directory. - Number of Images (Range)
Count of metaphase image files which have not been excluded by an image selection model or through manual exclusion in the metaphase image viewer. This number of images will be used when generating a calibration curve or when performing dose estimation. - Processed
“Yes” if the sample has been processed, “No” if it has not. - DC counts and frequencies
This section exists only if the sample has been processed.- SVM
SVM sigma values within the range 0.8-1.8 are listed. The entries below contain values related to each SVM sigma value listed. - # of DCs (All)
Number of DCs in all metaphase images found in the “Metaphase Images Path” directory. - # of DCs (Range)
Number of DCs in all metaphase images found in the “Metaphase Images Path” directory which have not been excluded by an image selection model or through manual exclusion in the metaphase image viewer. - DC/Cell (All)
Number of DCs in all metaphase images found in the “Metaphase Images Path” directory divided by the total number of images in the “Metaphase Images Path”. - DC/Cell (Range)
Number of DCs in all metaphase images found in the “Metaphase Images Path” directory which have not been excluded by an image selection model or through manual exclusion in the metaphase image viewer divided by the total number of images which have not been excluded by an image selection model or through manual exclusion in the metaphase image viewer.
Export DC results and filtering stats to a comma-separated file
Results of a processed samples can exported to a comma-separated-values(.csv) file to be analyzed in other tools. Simply highlight the sample and click the ![]() icon.
icon.
Only selected images will be included in the .csv file. Each row in the file represents an image. The file have 19 columns, which are image path, DC counts for sigma 0.8 to sigma 1.8, total object count, segmented object count, length-width ratio value, centromere density value, finite difference value, classified object count and classified object ratio.